WSO2 API Manager : Sharing API Subscriptions between developers

Subscription management is a crucial part of an API Management solution. WSO2 API Manager provides this capability to API developers via the API Portal (API Store) or via exposed portal APIs. API subscriptions are associated with applications. An API needs to be subscribed under an application and the application can have one or many APIs subscribed to it. This application is a logical space that represent a real life application. Each application would have an associated API key through which the API Can be consumed, This concept can be explained with the following example.


Lets look at this from the perspective of a local met department which exposes a set of APIs for consumption. They would be using WSO2 API Manager to expose the APIs. Lets consider WeatherNow as a company that would build an app to provide weather information. WeatherNow would consume multiple APIs provided by the local met department to display weather information on the app.


They need access to multiple APIs exposed by the local met department in order to get this app up and running. The app would provide information on the temperature, rainfall, snowfall and wind speed of a given location. All these data are exposed as individual APIs by the Met department. Developers from WeatherNow would need to subscribe to the required weather APIs from the met department. WeatherNow would create an application in API Manager to do so. This is illustrated in the diagram below


sub1


This works perfectly if you have just one developer from WeatherNow to access the developer portal and subscriptions, but what if there are multiple developers from WeatherNow working on these APIs. They cannot create their own subscriptions but is required to share the same subscription with each other. WSO2 API Manager facilitate this capability via the API Store. It is possible to enable subscription sharing where developers in the same organization share subscriptions with the other developers belonging to the same organization.

Sub2


This capability is disabled by default in the API Manager and can be enabled by commenting the following in api-manager.xml (<API-Manager_Home>\repository\conf\api-manager.xml).

<GroupingExtractor>org.wso2.carbon.apimgt.impl.DefaultGroupIDExtractorImpl</GroupingExtractor>


This capability takes into account the claim name ‘Organization’ in the user store to group the users. The DefaultGroupIDExtractorImpl can be modified to consider any other claim to group the users.

Please note that the this default extractor doesn’t work with SAML SSO. You need to write a custom implementation using the WSO2ISGroupIdExtractor.java class as an example.

Bulk Importing of API’s to API Manager

In the last post we discussed on a tool that allows an admin to bulk export API’s from WSO2 API Manager. This is a useful tool if you have large number of API’s that needs to be exported. This blog looks at another tool that I have written to import API’s to an API Manager. Bulk importing of API’s may not be as common occurrence as bulk export, in many cases API’s are selectively imported to the API Manager rather than importing everything at once. However you can still identify which API’s to be imported and include them inside a folder where the tool will pick all the API’s inside the folder and import them to the WSO2 API Manager. The source code and instructions on how to run this tool can be found in the following Git Repo.

https://github.com/nadeesha5814/APIBulkImport


Bulk exporting of API’s in WSO2 API Manager

WSO2 API Manager is really powerful Opensource API Management tool that would allow you to expose, secure, manage and monitor API’s exposed via the API Manager. The product now comes with a nice feature to export/import API’s from and to the API Manager deployment. This feature comes in handy when you want to migrate API’s from one environment to another or when you want to copy an API from one API Manager to another. The feature is exposed as a RESTful API that can be invoked from a REST client, CuRL or a 3rd party script.

The limitation of the current implementation is that it only allows a single API to be exported at once. This is fine for majority of use-cases but there may be some instances where you may have 100’s of API’s and it might not be practical to export each and every API individually. To avoid this situation I have written the following tool that would allow you to do a Bulk export of API’s from the API Manager. The code and the instructions on how to use this tool can  be found in the following GIT repo.

https://github.com/nadeesha5814/APIBulkExport


Integrating any WSO2 product to the LDAP user store of WSO2 Identity Server


Integrating to an external user-store is a feature that is available in the carbon kernel hence all WSO2 products has this feature available. However most of the product distributions are shipped with the product been integrated to a JDBC user-store which is linked to the inbuilt H2 DB.

WSO2 Identity Server which is the Identity and Access Management product of WSO2 has an in-built LDAP user-store. It is possible to integrate any other WSO2 product to this internal LDAP user store of the Identity Server to carry out testing on any cross product scenarios where the user-store needs to be shared with each other. Let’s see how this can be done.


In order to get this working you will need a WSO2 Identity Server product. In this case we are using the latest Identity Server version available (5.1.0). We will also need another WSO2 product that needs to integrate to the LDAP of the Identity Server, in this case we will choose WSO2 API Manager (1.10). First of all open the following user-mgt.xml file in the API Manager configuration which can be found in the following location.

<API_Manager_Home>\repository\conf\user-mgt.xml


Inside this configuration file you would see the user-store configuration relating to the product. The default product distribution is integrated to the inbuilt H2 Database through the JDBCUserStoreManager. Let’s comment this configuration. Now add the below configuration that would provide details on the remote LDAP instances hosted inside the WSO2 Identity Server. Note that we are setting ‘ConnectionURL’ assuming that the Identity Server runs on localhost.


<UserStoreManager class="org.wso2.carbon.user.core.ldap.ReadWriteLDAPUserStoreManager">
<Property name="TenantManager">org.wso2.carbon.user.core.tenant.CommonHybridLDAPTenantManager</Property>
<Property name="ConnectionURL">ldap://localhost:10389</Property>
<Property name="ConnectionName">uid=admin,ou=system</Property>
<Property name="ConnectionPassword">admin</Property>
<Property name="UserSearchBase">ou=Users,dc=wso2,dc=org</Property>
<Property name="UserEntryObjectClass">identityPerson</Property>
<Property name="UserNameAttribute">uid</Property>
<Property name="UserNameSearchFilter">(&amp;(objectClass=person)(uid=?))</Property>
<Property name="UserNameListFilter">(objectClass=person)</Property>
<Property name="DisplayNameAttribute"/>
<Property name="ReadGroups">true</Property>
<Property name="WriteGroups">true</Property>
<Property name="GroupSearchBase">ou=Groups,dc=wso2,dc=org</Property>
<Property name="GroupEntryObjectClass">groupOfNames</Property>
<Property name="GroupNameAttribute">cn</Property>
<Property name="GroupNameSearchFilter">(&amp;(objectClass=groupOfNames)(cn=?))</Property>
<Property name="GroupNameListFilter">(objectClass=groupOfNames)</Property>
<Property name="MembershipAttribute">member</Property>
<Property name="BackLinksEnabled">false</Property>
<Property name="UsernameJavaRegEx">[a-zA-Z0-9._-|//]{3,30}$</Property>
<Property name="UsernameJavaScriptRegEx">^[\S]{3,30}$</Property>
<Property name="UsernameJavaRegExViolationErrorMsg">Username pattern policy violated</Property>
<Property name="PasswordJavaRegEx">^[\S]{5,30}$</Property>
<Property name="PasswordJavaScriptRegEx">^[\S]{5,30}$</Property>
<Property name="PasswordJavaRegExViolationErrorMsg">Password length should be within 5 to 30 characters</Property>
<Property name="RolenameJavaRegEx">[a-zA-Z0-9._-|//]{3,30}$</Property>
<Property name="RolenameJavaScriptRegEx">^[\S]{3,30}$</Property>
<Property name="SCIMEnabled">true</Property>
<Property name="IsBulkImportSupported">true</Property>
<Property name="EmptyRolesAllowed">true</Property>
<Property name="PasswordHashMethod">PLAIN_TEXT</Property>
<Property name="MultiAttributeSeparator">,</Property>
<Property name="MaxUserNameListLength">100</Property>
<Property name="MaxRoleNameListLength">100</Property>
<Property name="kdcEnabled">false</Property>
<Property name="defaultRealmName">WSO2.ORG</Property>
<Property name="UserRolesCacheEnabled">true</Property>
<Property name="ConnectionPoolingEnabled">false</Property>
<Property name="LDAPConnectionTimeout">5000</Property>
<Property name="ReadTimeout"/>
<Property name="RetryAttempts"/>
</UserStoreManager>


In this case we are integrating the API Manager so that it can both read and write from the user-store, it is possible to configure the instance to only read from the external user-store in such a case change the class name to ‘org.wso2.carbon.user.core.ldap.ReadOnlyLDAPUserStoreManager’.


Start the Identity Server first and then the secondary WSO2 product (in this case the WSO2 API Manager). You can now see that users which resides in the WSO2 Identity Server is shared with the WSO2 API Manager instance.


Publish custom data from API Manager to WSO2 Business Activity Monitor

WSO2 API Manager provides out of the box integration with WSO2 Business Activity Monitor (WSO2 BAM), this integration would allow API Manager to publish a pre-defined event stream which would be stored, processed and summarized by WSO2 BAM to provide a meaningful set of information in the API Manager dashboard. A case may arise when an organization wants to publish custom data to the WSO2 BAM. For example a user may want to publish some values which are passed in the response message header to WSO2 BAM. In such a case the existing data Publisher needs to be customized to accommodate this custom value. API Manager’s extension mechanism allows you to write your own class to do this. In order to do this you can extend the ‘APIMgtUsageDataPublisher’ class and write your own data publisher. Given below is a custom data publisher written to pass a custom value to the WSO2 BAM. Please note that this is similar to the existing data publisher class with the difference of it using a custom DTO to publish response data.


package org.wso2.carbon.sample.apimgt.usage.publisher;
/**
* Created by NADEESHA on 12/14/2015.
*/
import org.wso2.carbon.apimgt.usage.publisher.APIMgtUsageDataBridgeDataPublisher;
import org.wso2.carbon.apimgt.usage.publisher.APIMgtUsageDataPublisher;
import org.wso2.carbon.apimgt.usage.publisher.DataPublisherUtil;
import org.wso2.carbon.apimgt.usage.publisher.dto.FaultPublisherDTO;
import org.wso2.carbon.apimgt.usage.publisher.dto.RequestPublisherDTO;
import org.wso2.carbon.apimgt.usage.publisher.dto.ResponsePublisherDTO;
import org.wso2.carbon.apimgt.usage.publisher.dto.ThrottlePublisherDTO;
import org.apache.commons.logging.Log;
import org.apache.commons.logging.LogFactory;
import org.wso2.carbon.apimgt.usage.publisher.dto.DataBridgeFaultPublisherDTO;
import org.wso2.carbon.apimgt.usage.publisher.dto.DataBridgeRequestPublisherDTO;
import org.wso2.carbon.sample.apimgt.usage.publisher.dto.CustomDataBridgeResponsePublisherDTO;
import org.wso2.carbon.apimgt.usage.publisher.dto.DataBridgeThrottlePublisherDTO;
import org.wso2.carbon.apimgt.usage.publisher.internal.DataPublisherAlreadyExistsException;
import org.wso2.carbon.apimgt.usage.publisher.internal.UsageComponent;
import org.wso2.carbon.context.CarbonContext;
import org.wso2.carbon.databridge.agent.thrift.exception.AgentException;
import org.wso2.carbon.databridge.agent.thrift.lb.DataPublisherHolder;
import org.wso2.carbon.databridge.agent.thrift.lb.LoadBalancingDataPublisher;
import org.wso2.carbon.databridge.agent.thrift.lb.ReceiverGroup;
import org.wso2.carbon.databridge.commons.exception.*;
import java.net.MalformedURLException;
import java.util.ArrayList;
import java.util.List;
public class CustomAPIMgtUsageDataBridgeDataPublisher implements APIMgtUsageDataPublisher {
private static final Log log = LogFactory.getLog(APIMgtUsageDataBridgeDataPublisher.class);
private LoadBalancingDataPublisher dataPublisher;
public void init(){
try {
if(log.isDebugEnabled()){
log.debug("Initializing APIMgtUsageDataBridgeDataPublisher");
}
this.dataPublisher = getDataPublisher();
//If Request Stream Definition does not exist.
if(!dataPublisher.isStreamDefinitionAdded(DataPublisherUtil.getApiManagerAnalyticsConfiguration().
getRequestStreamName(), DataPublisherUtil.getApiManagerAnalyticsConfiguration().
getRequestStreamVersion())){
//Get Request Stream Definition
String requestStreamDefinition = DataBridgeRequestPublisherDTO.getStreamDefinition();
//Add Request Stream Definition.
dataPublisher.addStreamDefinition(requestStreamDefinition,
DataPublisherUtil.getApiManagerAnalyticsConfiguration().getRequestStreamName(),
DataPublisherUtil.getApiManagerAnalyticsConfiguration().getRequestStreamVersion());
}
//If Response Stream Definition does not exist.
if(!dataPublisher.isStreamDefinitionAdded(DataPublisherUtil.getApiManagerAnalyticsConfiguration().
getResponseStreamName(), DataPublisherUtil.getApiManagerAnalyticsConfiguration()
.getResponseStreamVersion())){
//Get Response Stream Definition.
String responseStreamDefinition = CustomDataBridgeResponsePublisherDTO.getStreamDefinition();
//Add Response Stream Definition.
dataPublisher.addStreamDefinition(responseStreamDefinition,
DataPublisherUtil.getApiManagerAnalyticsConfiguration().getResponseStreamName(),
DataPublisherUtil.getApiManagerAnalyticsConfiguration().getResponseStreamVersion());
}
//If Fault Stream Definition does not exist.
if(!dataPublisher.isStreamDefinitionAdded(DataPublisherUtil.getApiManagerAnalyticsConfiguration().
getFaultStreamName(), DataPublisherUtil.getApiManagerAnalyticsConfiguration().
getFaultStreamVersion())){
//Get Fault Stream Definition
String faultStreamDefinition = DataBridgeFaultPublisherDTO.getStreamDefinition();
//Add Fault Stream Definition;
dataPublisher.addStreamDefinition(faultStreamDefinition,
DataPublisherUtil.getApiManagerAnalyticsConfiguration().getFaultStreamName(),
DataPublisherUtil.getApiManagerAnalyticsConfiguration().getFaultStreamVersion());
}
//If Throttle Stream Definition does not exist.
if(!dataPublisher.isStreamDefinitionAdded(DataPublisherUtil.getApiManagerAnalyticsConfiguration().
getThrottleStreamName(), DataPublisherUtil.getApiManagerAnalyticsConfiguration().
getThrottleStreamVersion())){
//Get Throttle Stream Definition
String throttleStreamDefinition = DataBridgeThrottlePublisherDTO.getStreamDefinition();
//Add Throttle Stream Definition;
dataPublisher.addStreamDefinition(throttleStreamDefinition,
DataPublisherUtil.getApiManagerAnalyticsConfiguration().getThrottleStreamName(),
DataPublisherUtil.getApiManagerAnalyticsConfiguration().getThrottleStreamVersion());
}
}catch (Exception e){
log.error("Error initializing APIMgtUsageDataBridgeDataPublisher", e);
}
}
public void publishEvent(RequestPublisherDTO requestPublisherDTO) {
DataBridgeRequestPublisherDTO dataBridgeRequestPublisherDTO = new DataBridgeRequestPublisherDTO(requestPublisherDTO);
try {
//Publish Request Data
dataPublisher.publish(DataPublisherUtil.getApiManagerAnalyticsConfiguration().getRequestStreamName(),
DataPublisherUtil.getApiManagerAnalyticsConfiguration().getRequestStreamVersion() ,
System.currentTimeMillis(), new Object[]{"external"}, null,
(Object[]) dataBridgeRequestPublisherDTO.createPayload());
} catch(AgentException e){
log.error("Error while publishing Request event", e);
}
}
public void publishEvent(ResponsePublisherDTO customResponsePublisherDTO) {
CustomDataBridgeResponsePublisherDTO dataBridgeResponsePublisherDTO = new CustomDataBridgeResponsePublisherDTO(customResponsePublisherDTO);
try {
DataPublisherUtil.getApiManagerAnalyticsConfiguration().getResponseStreamName();
DataPublisherUtil.getApiManagerAnalyticsConfiguration().getResponseStreamVersion();
dataBridgeResponsePublisherDTO.createPayload();
//Publish Response Data
dataPublisher.publish(DataPublisherUtil.getApiManagerAnalyticsConfiguration().getResponseStreamName(),
DataPublisherUtil.getApiManagerAnalyticsConfiguration().getResponseStreamVersion() ,
System.currentTimeMillis(), new Object[]{"external"}, null,
(Object[]) dataBridgeResponsePublisherDTO.createPayload());
} catch (AgentException e) {
log.error("Error while publishing Response event", e);
}
}
public void publishEvent(FaultPublisherDTO faultPublisherDTO) {
DataBridgeFaultPublisherDTO dataBridgeFaultPublisherDTO = new DataBridgeFaultPublisherDTO(faultPublisherDTO);
try {
//Publish Fault Data
dataPublisher.publish(DataPublisherUtil.getApiManagerAnalyticsConfiguration().getFaultStreamName(),
DataPublisherUtil.getApiManagerAnalyticsConfiguration().getFaultStreamVersion() ,
System.currentTimeMillis(), new Object[]{"external"}, null,
(Object[]) dataBridgeFaultPublisherDTO.createPayload());
} catch (AgentException e) {
log.error("Error while publishing Fault event", e);
}
}
public void publishEvent(ThrottlePublisherDTO throttPublisherDTO) {
DataBridgeThrottlePublisherDTO dataBridgeThrottlePublisherDTO = new
DataBridgeThrottlePublisherDTO(throttPublisherDTO);
try {
//Publish Throttle data
dataPublisher.publish(DataPublisherUtil.getApiManagerAnalyticsConfiguration().getThrottleStreamName(),
DataPublisherUtil.getApiManagerAnalyticsConfiguration().getThrottleStreamVersion(),
System.currentTimeMillis(), new Object[]{"external"}, null,
(Object[]) dataBridgeThrottlePublisherDTO.createPayload());
} catch (AgentException e) {
log.error("Error while publishing Throttle exceed event", e);
}
}
private static LoadBalancingDataPublisher getDataPublisher()
throws AgentException, MalformedURLException, AuthenticationException,
TransportException {
String tenantDomain = CarbonContext.getThreadLocalCarbonContext().getTenantDomain();
//Get LoadBalancingDataPublisher which has been registered for the tenant.
LoadBalancingDataPublisher loadBalancingDataPublisher = UsageComponent.getDataPublisher(tenantDomain);
//If a LoadBalancingDataPublisher had not been registered for the tenant.
if(loadBalancingDataPublisher == null){
List<String> receiverGroups = org.wso2.carbon.databridge.agent.thrift.util.DataPublisherUtil.
getReceiverGroups(DataPublisherUtil.getApiManagerAnalyticsConfiguration().getBamServerUrlGroups());
String serverUser = DataPublisherUtil.getApiManagerAnalyticsConfiguration().getBamServerUser();
String serverPassword = DataPublisherUtil.getApiManagerAnalyticsConfiguration().getBamServerPassword();
List<ReceiverGroup> allReceiverGroups = new ArrayList<ReceiverGroup>();
for(String receiverGroupString : receiverGroups){
String[] serverURLs = receiverGroupString.split(",");
List<DataPublisherHolder> dataPublisherHolders = new ArrayList<DataPublisherHolder>();
for(int i=0; i<serverURLs.length; i++){
String serverURL = serverURLs[i];
DataPublisherHolder dataPublisherHolder =
new DataPublisherHolder(null, serverURL, serverUser, serverPassword);
dataPublisherHolders.add(dataPublisherHolder);
}
ReceiverGroup receiverGroup = new ReceiverGroup((ArrayList)dataPublisherHolders);
allReceiverGroups.add(receiverGroup);
}
//Create new LoadBalancingDataPublisher for the tenant.
loadBalancingDataPublisher = new LoadBalancingDataPublisher((ArrayList)allReceiverGroups);
try {
//Add created LoadBalancingDataPublisher.
UsageComponent.addDataPublisher(tenantDomain, loadBalancingDataPublisher);
} catch (DataPublisherAlreadyExistsException e) {
log.warn("Attempting to register a data publisher for the tenant " + tenantDomain +
" when one already exists. Returning existing data publisher");
return UsageComponent.getDataPublisher(tenantDomain);
}
}
return loadBalancingDataPublisher;
}
}

This custom data publisher refers to a ‘CustomDataBridgeResponsePublisherDTO’ to publish data to WSO2 BAM. Given below is the custom DataBridgeResponsePublisherDTO.


package org.wso2.carbon.sample.apimgt.usage.publisher.dto;
/**
* Created by NADEESHA on 12/14/2015.
*/
import org.wso2.carbon.apimgt.usage.publisher.DataPublisherUtil;
import org.wso2.carbon.apimgt.usage.publisher.dto.ResponsePublisherDTO;
public class CustomDataBridgeResponsePublisherDTO extends ResponsePublisherDTO {
String customValue;
public String getCustomValue() {
// Create the logic to get the custom value, you can create your own response DTO and include ur logic there
String sampleVal = "THIS IS MY CUSTOM VALUE – Nadeesha";
return sampleVal;
}
public void setCustomValue(String customValue) {
this.customValue = customValue;
}
public CustomDataBridgeResponsePublisherDTO(ResponsePublisherDTO responsePublisherDTO) {
setConsumerKey(responsePublisherDTO.getConsumerKey());
setContext(responsePublisherDTO.getContext());
setApi_version(responsePublisherDTO.getApi_version());
setApi(responsePublisherDTO.getApi());
setResourcePath(responsePublisherDTO.getResourcePath());
setMethod(responsePublisherDTO.getMethod());
setVersion(responsePublisherDTO.getVersion());
setResponseTime(responsePublisherDTO.getResponseTime());
setServiceTime(responsePublisherDTO.getServiceTime());
setBackendTime(responsePublisherDTO.getBackendTime());
setUsername(responsePublisherDTO.getUsername());
setEventTime(responsePublisherDTO.getEventTime());
setTenantDomain(responsePublisherDTO.getTenantDomain());
setHostName(DataPublisherUtil.getHostAddress());
setApiPublisher(responsePublisherDTO.getApiPublisher());
setApplicationName(responsePublisherDTO.getApplicationName());
setApplicationId(responsePublisherDTO.getApplicationId());
setCacheHit(responsePublisherDTO.getCacheHit());
setResponseSize(responsePublisherDTO.getResponseSize());
setProtocol(responsePublisherDTO.getProtocol());
}
public static String getStreamDefinition() {
return "{" +
" 'name':'" +
DataPublisherUtil.getApiManagerAnalyticsConfiguration().getResponseStreamName() + "'," +
" 'version':'" +
DataPublisherUtil.getApiManagerAnalyticsConfiguration().getResponseStreamVersion() + "'," +
" 'nickName': 'API Manager Response Data'," +
" 'description': 'Response Data'," +
" 'metaData':[" +
" {'name':'clientType','type':'STRING'}" +
" ]," +
" 'payloadData':[" +
" {'name':'consumerKey','type':'STRING'}," +
" {'name':'context','type':'STRING'}," +
" {'name':'api_version','type':'STRING'}," +
" {'name':'api','type':'STRING'}," +
" {'name':'resourcePath','type':'STRING'}," +
" {'name':'method','type':'STRING'}," +
" {'name':'version','type':'STRING'}," +
" {'name':'response','type':'INT'}," +
" {'name':'responseTime','type':'LONG'}," +
" {'name':'serviceTime','type':'LONG'}," +
" {'name':'backendTime','type':'LONG'}," +
" {'name':'username','type':'STRING'}," +
" {'name':'eventTime','type':'LONG'}," +
" {'name':'tenantDomain','type':'STRING'}," +
" {'name':'hostName','type':'STRING'}," +
" {'name':'apiPublisher','type':'STRING'}," +
" {'name':'applicationName','type':'STRING'}," +
" {'name':'applicationId','type':'STRING'}," +
" {'name':'cacheHit','type':'BOOL'}," +
" {'name':'responseSize','type':'LONG'}," +
" {'name':'protocol','type':'STRING'}," +
" {'name':'customValue','type':'STRING'}" +
" ]" +
"}";
}
public Object createPayload() {
return new Object[]{getConsumerKey(), getContext(), getApi_version(), getApi(),
getResourcePath(), getMethod(),
getVersion(), getResponse(),getResponseTime(), getServiceTime(), getBackendTime(), getUsername(),
getEventTime(), getTenantDomain(), getHostName(),
getApiPublisher(), getApplicationName(), getApplicationId(), getCacheHit(),
getResponseSize(),getProtocol(),getCustomValue()};
}
}

As you could see here, we have add a ‘customValue’ field to the original datastream , and when creating the payload the custom value is included in the payload. In this example we are passing a string as the custom value, this logic can be replaced to pass any other value to WSO2 BAM.


Once you have done this changes build the source and add the jar file to the following folder.

<API_Manager_Home>\repository\components\lib


Java project file is attached for you to customize the values as required and build (through Maven).

Once this is done lets add the datapublisher class to APIManager.xml file. Lets modify the file to reflect the details of our custom data publisher. Given below is a sample snippet of the file. Notice that the custom data publisher is included as the ‘PublisherClass’ and the version of the response stream has been changed to’1.1.0′.


<APIUsageTracking>
<SkipEventReceiverConnection>false</SkipEventReceiverConnection>
<PublisherClass>org.wso2.carbon.sample.apimgt.usage.publisher.CustomAPIMgtUsageDataBridgeDataPublisher</PublisherClass>
<BAMServerURL>{tcp://localhost:7612/}</BAMServerURL>
<BAMUsername>admin</BAMUsername>
<BAMPassword>admin</BAMPassword>
<PublishResponseMessageSize>false</PublishResponseMessageSize>
<Streams>
<Request>
<Name>org.wso2.apimgt.statistics.request</Name>
<Version>1.0.0</Version>
</Request>
<Response>
<Name>org.wso2.apimgt.statistics.response</Name>
<Version>1.1.0</Version>
</Response>
<Fault>
<Name>org.wso2.apimgt.statistics.fault</Name>
<Version>1.0.0</Version>
</Fault>
<Destination>
<Name>org_wso2_apimgt_statistics_destination</Name>
<Version>1.0.0</Version>
<BAMProfileName>bam-profile</BAMProfileName>
</Destination>
<Throttle>
<Name>org.wso2.apimgt.statistics.throttle</Name>
<Version>1.0.0</Version>
</Throttle>
<Workflow>
<Name>org.wso2.apimgt.statistics.workflow</Name>
<Version>1.0.0</Version>
</Workflow>
</Streams>
</APIUsageTracking>

view raw

Api-Manager.xml

hosted with ❤ by GitHub

Now lets look at the changes needed to be done to WSO2 BAM, we need configure WSO2 BAM to expect this new data stream. You can do this by configuring the API Manage toolbox to include this value. The toolbox can be found in the following location.

<API_Manager_Home>\wso2am-1.9.1\statistics

The toolbox is a compressed file (.tbox format) that can be uncompressed, amended and re-compressed backed to a ‘.tbox’ file. I have attached a modified ‘.tbox’ file with this blog. This toolbox is configured to accept the field ‘customValue’ received in the response data stream.

Once you have a modified toolbox you enable statistics from the ‘admin-dashboard’ of API Manager which will automatically install this new toolbox to WSO2 BAM. Please make sure that you have uninstalled any existing API Manager toolbox before doing this.


You have now configured to publish a custom data value from WSO2 API Manager to WSO2 BAM


Git Project for the this example is given below. Toolbox is also available within this project.

https://github.com/nadeesha5814/Custom_Analytics

Enabling artifact types in WSO2 Governance Registry Publisher and Store UI’s


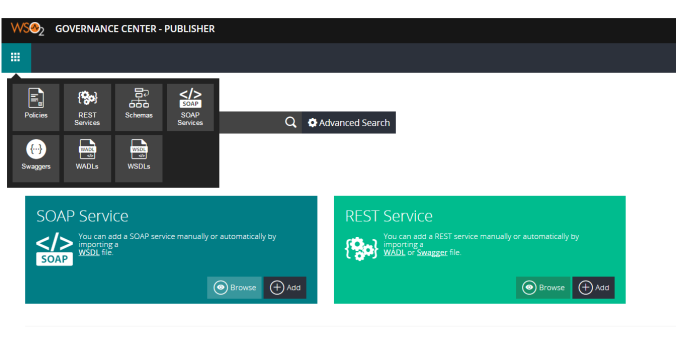
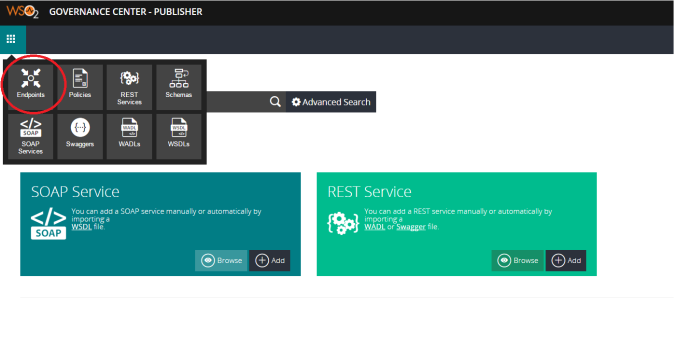
New generation of WSO2 Governance Registry (5.x) releases has its own publisher and store user interfaces to publish and consume assets. Asset owners can publish the assets from the Publisher UI and manage the lifecycle of these assets from this UI, while consumers of assets can discover them from the Store UI. WSO2 Governance Registry currently ships many asset types however not every asset type is enabled in the Governance Registry Publisher and Store UI’s. Let’s take the asset type endpoints. This asset type is available in the default Governance Registry distribution but the Publisher and Store UI’s doesn’t have this asset type. Hence it is not possible to create endpoints from the PublisherUI or consume/view these assets from the Store UI. As you see below the Publisher doesn’t show an asset type endpoint in the Publisher UI.

AssetType-before

To enable the asset in the Publisher lets open the following config file

<G-Reg Home>\repository\deployment\server\jaggeryapps\publisher\extensions\app\greg_publisher\app.js

You will find the following code snippet; remove the asset from the disabledAssets section.


configs: {
landingPage: '/pages/gc-landing',
disabledAssets: ['ebook','proxy','sequence','service','servicex','uri',
'site','provider','gadget','document','endpoint','topic','reply', 'server'],
uiDisabledAssets: ['note']
}

view raw

app.js

hosted with ❤ by GitHub

Restart the server, the asset type is now available in the Publisher UI.

AssetType-after

You can also enable a given asset type in the store UI. In order to do this you will need to do the same change in the following file.

<G-Reg Home>\repository\deployment\server\jaggeryapps\store\extensions\app\greg_store\app.js

Role based API Throttling through WSO2 API Manager

If you are already familiar with the WSO2 API Manager you would know that the API Manager provides the capability to apply throttling tiers to an exposed API. A throttling tier is an access limit which is applied to a given API subscription to make sure that API’s are not used over and above the expected level. WSO2 API Manager’s subscription plan is such that an API Subscriber can choose from a set of throttling tiers available to him when subscribing for an API. By default all the throttling tiers are available for all users. 

In real world an organization would want to have control over how users can subscribe and access their API’s. Opening up all the tiers to all users may not be acceptable. In order to address this concern API Manager provides a capability to assign roles to different throttling tiers hence only users belonging to a given role would have access to that particular throttling tier. Lets take the following example. You would have multiple user groups such as internal developers, registered external partners, and guest external partners. You would want to open up your API’s for these users but want to have different plans to these users. For this example we will only be dealing with the existing throttling tiers, based on this I will create the following mapping of user roles to tiers.

Bronze Tier - No Restriction
Silver Tier - All users expect guest external partners
Gold Tier   - Only Internal developers and Admin users
Unlimited   - Only Admin users

These restrictions can be created from the API Publisher’s user interface. In order to do this, login into the Publisher console as a API Publisher. Once you are logged in you will see the ‘Tier Permissions’ link on the left hand navigation panel. Click on the this link. Once you are in the Tier Permission page set the roles to which you need to ‘Allow’ or ‘Deny’ to a given throttling tier.tierPermission

You can Create your own throttling tiers [1] and then define how these tiers should be made available to different application developers using the Tier Permission option provided available in the API Publisher.

[1] https://docs.wso2.com/display/AM191/Adding+new+Throttling+Tiers

XACML Reference Architecture based on WSO2 Identity Server

XACML is a powerful access control policy language implemented in XML that can provide a standardized way of validating authorization requests. XACML is the de-facto standard for authorization and provides the ability for a 3rd party application/component to enforce attribute based access control.

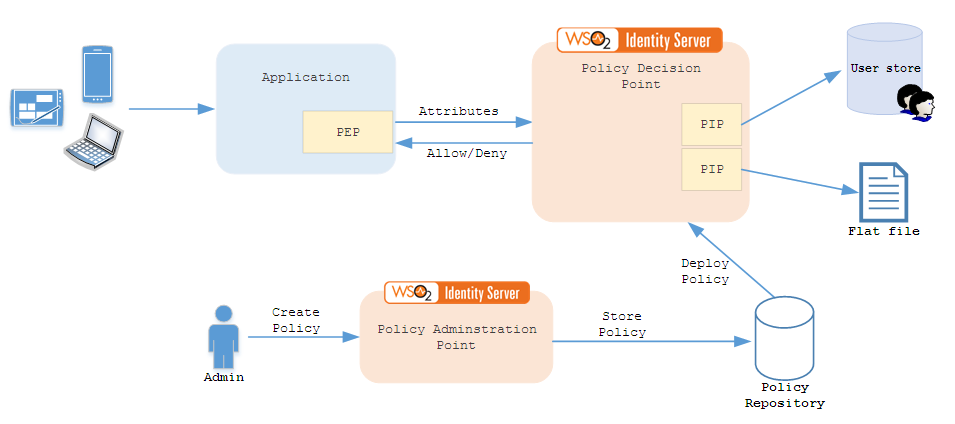
Given below is a reference architecture on how different XACML components can work in the deployment.

Xacml

Policy Enforcement Point (PEP) – PEP is a component that would enforce access control to a resource based on the input received from a Policy Decision Point (PDP). In the actual deployment PEP can be an application that would provide access to a resource. PEP would send attributes to the PDP and the PDP would reply back with response that would be either to allow or deny access to a resource.

Policy Decision Point (PDP) – PDP is the XACML engine that makes policy decisions on behalf of an enforcement point. PDP would make policy decisions based on a set of XACML polices that are deployed in the PDP.

Policy Information Point (PIP) –  PIP is an information source to which PDP can refer to and get more information on an attribute. PIP can be a user store, a flat file, a DB or any data source. For example if the PDP receives a username as an attribute, it can refer to a user store and get the set of roles assigned to that particular role to make a decision on whether to deny or grant access to a resource.

Policy Administration Point (PAP) – PAP is a component from which XACML policies are created/uploaded, edited and deployed to a PDP. An authorized user can come and create these policies in the PAP and the required policies can be deployed to the PDP.

Policy Repository – Policy Repository is where all the XACML policies are stored, policy repository can also manage multiple versions of a XACML policy.

Adding WSO2 public certificate to Java Certificate Store

When using WSO2 Identity Server to provide OpenID Connect based SSO, you may encounter the following error,

javax.net.ssl.SSLHandshakeException: sun.security.validator.ValidatorException: PKIX path building failed: sun.security.provider.certpath.SunCertPathBuilderException: unable to find valid certification path to requested target

This is commonly observed when trying to generate an access token from the WSO2 Identity Server. This error occurs due to the fact that the public key of the WSO2 Identity Server doesnt exist in the Java certificate store. You can follow the steps given below to avoid this error.

1. Generate a public key from the WSO2 carbon keystore – To do this you would need to access the following folder. <IS HOME>\repository\resources\security. Once inside the folder, run the below command to export the public certificate.

keytool -export -keystore wso2carbon.jks -alias wso2carbon -file wso2PubCert.cer

you will be prompted to enter the password, the default password is ‘wso2carbon’. If this command is executed correctly you will see a newly created PubCert.cer certificate file in this folder.

2. Import the certificate to the Java certificate store -To import the certificate navigate to the following folder. <JavaHome>/jre/lib/security. Open a console from here and run the following command to get the number of certificates that are currently in the certificate store.

keytool -list -keystore cacerts

Default Password : ‘changeit’

This will list down all the certificates in the store. If you scroll up you would see the number of certificates in the store.

Lets import the WSO2 public certificate to this certificate store. You can do this by running the following command. For Windows users please make sure that your command prompt is running as administrator.

keytool -import -keystore cacerts -file <Certificate Path>\wso2PubCert.cer

Default Password : ‘changeit’

You will get the confirmation that the certificate is successfully imported, you can validate this by listing the certificates using the list certificates command given above.

You should now be able to access the OAuth 2.0 endpoint of the WSO2 Identity Server and generate an access token.

Accessing an OAuth 2.0 secured API in WSO2 API Manager with a SAML 2 Bearer token

One of the key feature provided by the WSO2 API Manager is its ability to secure the exposed API’s using OAuth 2.0 tokens. WSO2 API Manager supports all 4 grant types of OAuth 2.0 specification. OAuth 2.0 is a specification that is widely adapted especially in the mobile application space. However we still find the need for API’s to be accessed by web applications that still use standard username-password based credentials. Many of these web applications use SAML 2 based authentication and would prefer to use the same SAML assertion to access OAuth 2.0 protected API’s. This type of a scenario is supported by WSO2 API Manager which supports a SAML 2 Bearer grant type that can allow an application to exchange the SAML 2 bearer token with an OAuth 2.0 access token. This token exchange is transparent to the end-user hence it will not impact their user experience. This token exchange process can be depicted in the diagram below.diag

Step 1 – Application receives a SAML assertion from the SAML IdP after authenticating the user.

Step 2 – When the Application needs to invoke an API, it sends the SAML assertion to the token endpoint of the API Manager. SAML assertion is Base 64 encoded and sent as a SAML Bearer grant. Application will also need to send the consumer key and consumer secret which has to be obtained when subscribing to this API.

Step 3– API Manager will validate the request and exchange the SAML token with an OAuth 2.0 access token and a refresh token.

Step 4 – Application Access the API with the OAuth 2.0 access token (generated in the above step). This OAuth 2.0 token should be included as the Authorization header when invoking API’s via the API Manager.

The objective of this blog is to introduce the concept of token exchange, you would find detailed instructions on how to set this up in the following API Manager document.

https://docs.wso2.com/pages/viewpage.action?pageId=47515509